
Client (alle Plattformen) - Anleitung zum selber kompilieren
Dieser Guide stellt Grundlagen dar, die es braucht, um das Borepin-Projekt auf verschiedenen Betriebssystemen auszuchecken und erfolgreich zu kompilieren. Alle weiteren Details zum Umgang bedürfen Grundkenntnissen der Programmier- und Entwicklungstätigkeit mit C#, UWP, MAUI/Xamarin, Prism und Co.
Unter Windows
Für die Kompilierung des FabAccess Clients Borepin benötigen wir verschiedene Komponenten:
Installation von Mono GTKSharp
Mono wird nicht mehr weiterentwickelt. Wir nutzen das letzte Release 2.12.45 vom 14.11.2022
- Releases: https://github.com/mono/gtk-sharp/releases/
- Direkter Downloadlink: https://github.com/mono/gtk-sharp/releases/download/2.12.45/gtk-sharp-2.12.45.msi
Installation von Cap'n Proto
Variante 1
Downloads: https://capnproto.org
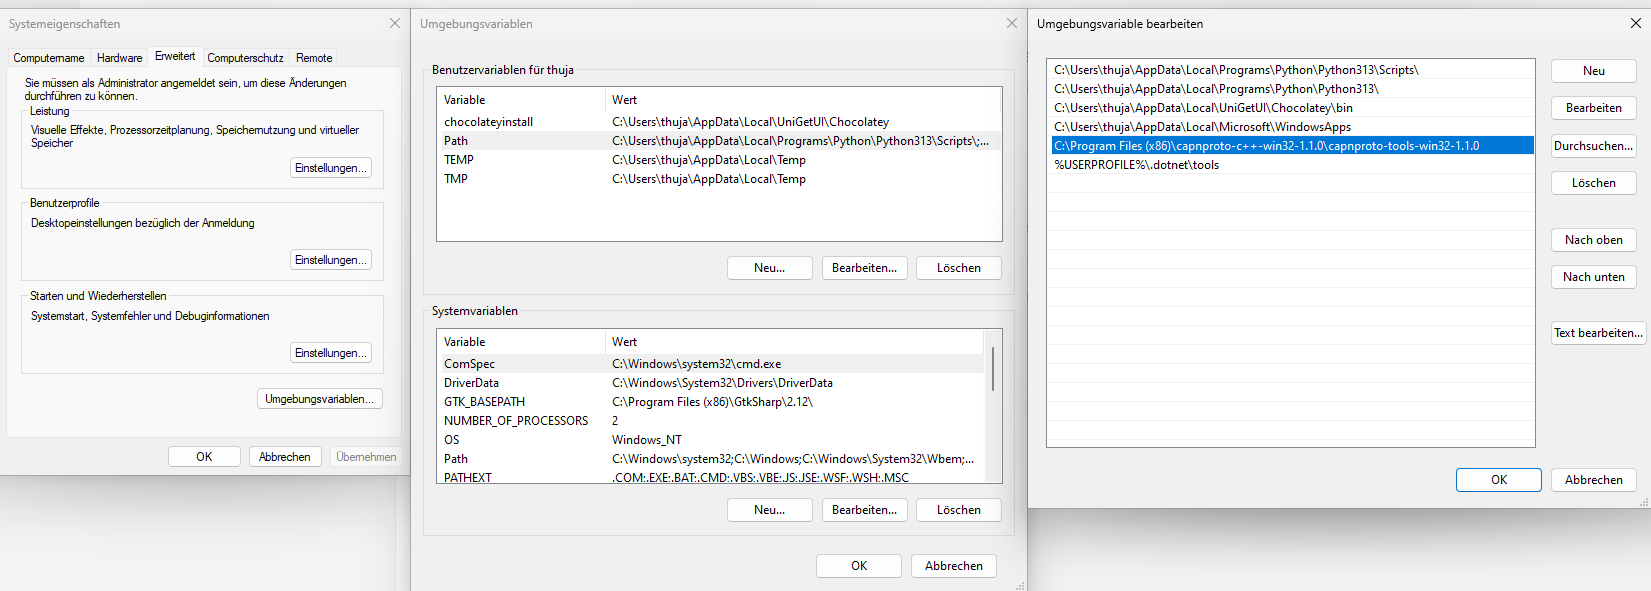
Nach dem Entpacken muss das Verzeichnis mit den Executables per in Umgebungsvariable %PATH% eingebunden werden, zum Beispiel C:\Program Files (x86)\capnproto-c++-win32-1.1.0\capnproto-tools-win32-1.1.0:
Variante 2
Installation mit Chocolatey. Chocolatey selbst kann zum Beispiel über die Windows Shell (cmd.exe) oder PowerShell (powershell.exe) installiert werden, oder auch über das praktische Update-Utility UniGetUI (wird automatisch mitinstalliert).
choco install capnprotoAusgabe von chocolatey
PS C:\Users\thuja> choco install capnproto
Chocolatey v2.2.2
Directory 'C:\Users\thuja\AppData\Local\UniGetUI\Chocolatey\lib' does not exist.
Installing the following packages:
capnproto
By installing, you accept licenses for the packages.
Progress: Downloading capnproto 1.0.2... 100%
capnproto v1.0.2 [Approved]
capnproto package files install completed. Performing other installation steps.
The package capnproto wants to run 'chocolateyinstall.ps1'.
Note: If you don't run this script, the installation will fail.
Note: To confirm automatically next time, use '-y' or consider:
choco feature enable -n allowGlobalConfirmation
Do you want to run the script?([Y]es/[A]ll - yes to all/[N]o/[P]rint): y
Downloading capnproto
from 'https://capnproto.org/capnproto-c++-win32-1.0.2.zip'
Progress: 100% - Completed download of C:\Users\thuja\AppData\Local\Temp\chocolatey\capnproto\1.0.2\capnproto-c++-win32-1.0.2.zip (4.41 MB).
Download of capnproto-c++-win32-1.0.2.zip (4.41 MB) completed.
Hashes match.
Extracting C:\Users\thuja\AppData\Local\Temp\chocolatey\capnproto\1.0.2\capnproto-c++-win32-1.0.2.zip to C:\Users\thuja\AppData\Local\UniGetUI\Chocolatey\lib\capnproto\tools...
C:\Users\thuja\AppData\Local\UniGetUI\Chocolatey\lib\capnproto\tools
ShimGen has successfully created a shim for capnp.exe
ShimGen has successfully created a shim for capnpc-c++.exe
ShimGen has successfully created a shim for capnpc-capnp.exe
The install of capnproto was successful.
Software installed to 'C:\Users\thuja\AppData\Local\UniGetUI\Chocolatey\lib\capnproto\tools'
Chocolatey installed 1/1 packages.
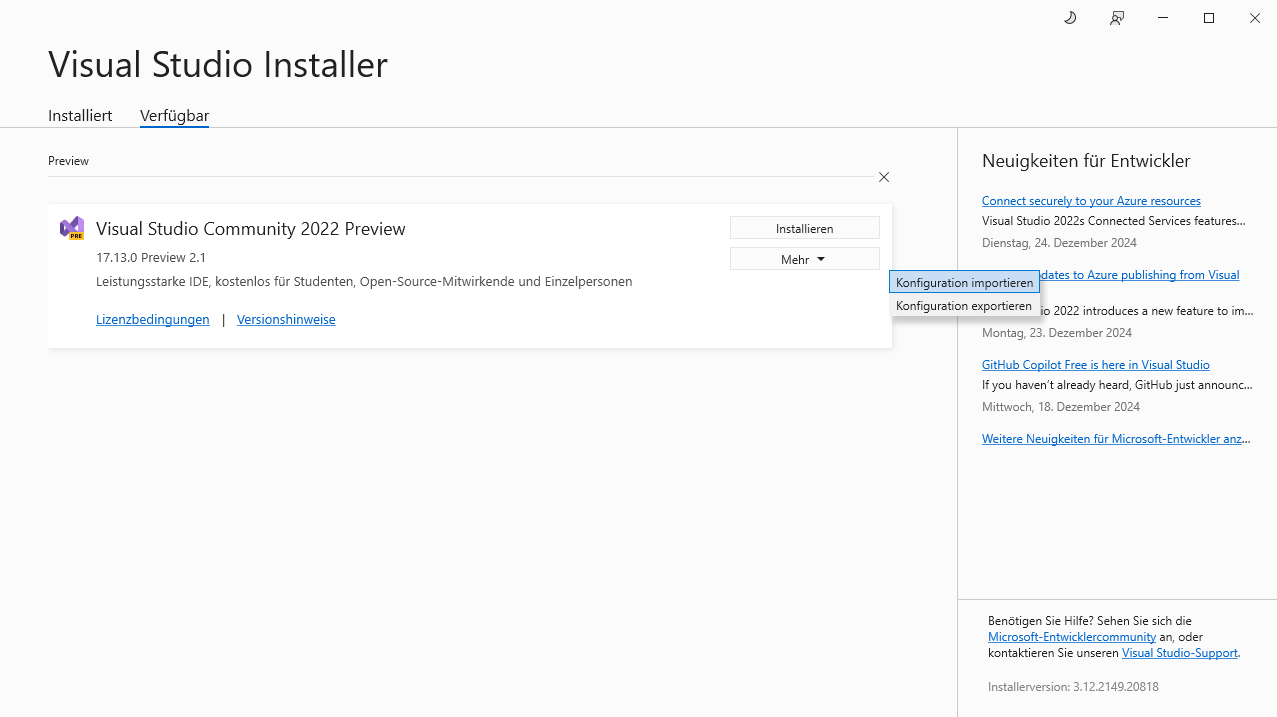
See the log for details (C:\Users\thuja\AppData\Local\UniGetUI\Chocolatey\logs\chocolatey.log).Installation von Microsoft Visual Studio 2022 Community Edition
Das Setup wurde zuletzt mit Version 17.12.3 getestet.
- Download des Installers (ältere Versionen benötigen eine aktive Subscription - das ist nicht empfehlenswert)
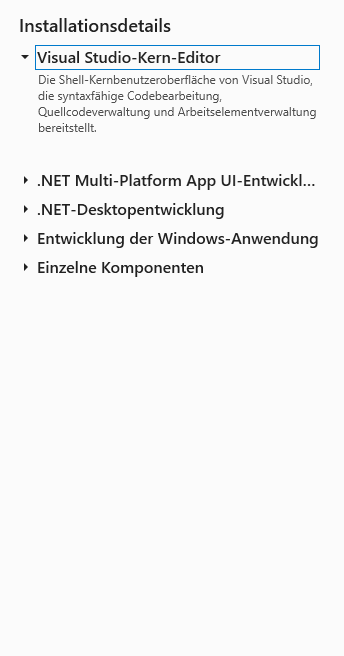
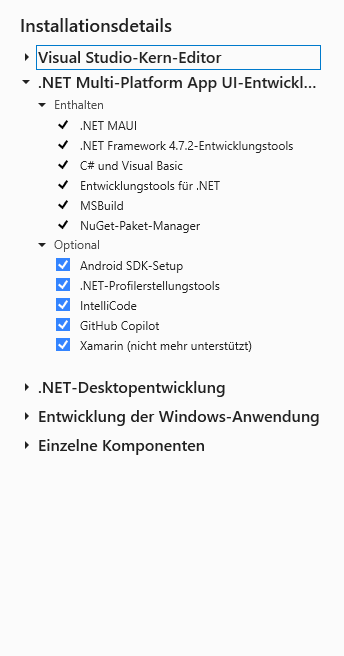
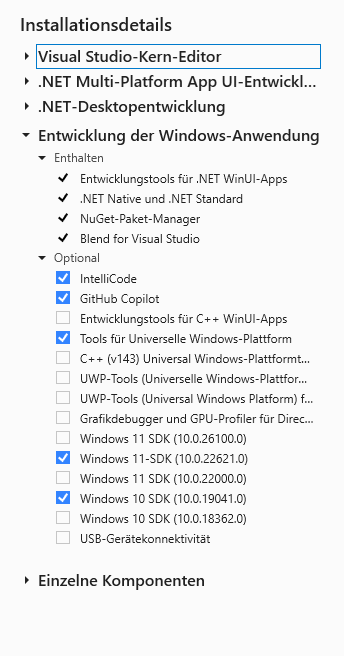
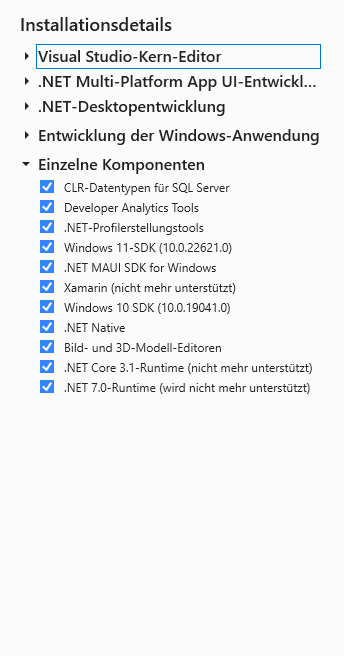
- Folgende Pakete werden außerdem benötigt. Die folgende Konfigurationsdatei
.vsconfigkann im SetupVisualStudioSetup.exegeladen werden:
{
  "version": "1.0",
  "components": [
    "Microsoft.VisualStudio.Component.CoreEditor",
    "Microsoft.VisualStudio.Workload.CoreEditor",
    "Microsoft.Net.Component.4.8.SDK",
    "Microsoft.Net.Component.4.7.2.TargetingPack",
    "Microsoft.Net.ComponentGroup.DevelopmentPrerequisites",
    "Microsoft.VisualStudio.Component.TypeScript.TSServer",
    "Microsoft.VisualStudio.ComponentGroup.WebToolsExtensions",
    "Microsoft.VisualStudio.Component.JavaScript.TypeScript",
    "Microsoft.VisualStudio.Component.JavaScript.Diagnostics",
    "Microsoft.VisualStudio.Component.Roslyn.Compiler",
    "Microsoft.Component.MSBuild",
    "Microsoft.VisualStudio.Component.Roslyn.LanguageServices",
    "Microsoft.VisualStudio.Component.TextTemplating",
    "Microsoft.VisualStudio.Component.NuGet",
    "Microsoft.VisualStudio.Component.SQL.CLR",
    "Microsoft.Component.ClickOnce",
    "Microsoft.VisualStudio.Component.ManagedDesktop.Core",
    "Microsoft.NetCore.Component.Runtime.9.0",
    "Microsoft.NetCore.Component.Runtime.8.0",
    "Microsoft.NetCore.Component.SDK",
    "Microsoft.VisualStudio.Component.FSharp",
    "Microsoft.ComponentGroup.ClickOnce.Publish",
    "Microsoft.NetCore.Component.DevelopmentTools",
    "Microsoft.VisualStudio.Component.AppInsights.Tools",
    "Microsoft.Net.Component.4.8.TargetingPack",
    "Microsoft.Net.ComponentGroup.4.8.DeveloperTools",
    "Microsoft.VisualStudio.Component.DiagnosticTools",
    "Microsoft.VisualStudio.Component.EntityFramework",
    "Microsoft.VisualStudio.Component.Debugger.JustInTime",
    "Component.Microsoft.VisualStudio.LiveShare.2022",
    "Microsoft.VisualStudio.Component.IntelliCode",
    "Component.VisualStudio.GitHub.Copilot",
    "Microsoft.NetCore.Component.Runtime.6.0",
    "microsoft.net.runtime.mono.tooling",
    "microsoft.net.runtime.mono.tooling.net8",
    "Microsoft.VisualStudio.Component.Windows11SDK.22621",
    "maui.core",
    "maui.blazor",
    "microsoft.net.runtime.android.net8",
    "microsoft.net.runtime.android.aot.net8",
    "microsoft.net.runtime.android",
    "microsoft.net.runtime.android.aot",
    "android",
    "Component.OpenJDK",
    "Microsoft.VisualStudio.Component.MonoDebugger",
    "Microsoft.VisualStudio.Component.Merq",
    "Microsoft.VisualStudio.ComponentGroup.Maui.Android",
    "runtimes.ios",
    "microsoft.net.runtime.ios",
    "runtimes.ios.net8",
    "microsoft.net.runtime.ios.net8",
    "ios",
    "Component.Xamarin.RemotedSimulator",
    "Microsoft.VisualStudio.ComponentGroup.Maui.iOS",
    "runtimes.maccatalyst",
    "microsoft.net.runtime.maccatalyst",
    "runtimes.maccatalyst.net8",
    "microsoft.net.runtime.maccatalyst.net8",
    "maccatalyst",
    "Microsoft.VisualStudio.ComponentGroup.Maui.MacCatalyst",
    "maui.windows",
    "Microsoft.VisualStudio.ComponentGroup.MSIX.Packaging",
    "Microsoft.VisualStudio.ComponentGroup.Maui.Windows",
    "Microsoft.VisualStudio.ComponentGroup.Maui.Blazor",
    "Microsoft.VisualStudio.ComponentGroup.WebToolsExtensions.TemplateEngine",
    "Microsoft.VisualStudio.ComponentGroup.Maui.Shared",
    "Microsoft.VisualStudio.ComponentGroup.Maui.All",
    "Component.Android.SDK.MAUI",
    "Component.Xamarin",
    "Microsoft.VisualStudio.Workload.NetCrossPlat",
    "Microsoft.VisualStudio.Component.ManagedDesktop.Prerequisites",
    "Microsoft.VisualStudio.Component.DotNetModelBuilder",
    "Microsoft.VisualStudio.ComponentGroup.WindowsAppSDK.Cs",
    "Microsoft.ComponentGroup.Blend",
    "Microsoft.VisualStudio.Workload.ManagedDesktop",
    "Microsoft.VisualStudio.Component.Windows10SDK.19041",
    "Microsoft.Component.NetFX.Native",
    "Microsoft.VisualStudio.Component.Graphics",
    "Microsoft.VisualStudio.ComponentGroup.UWP.Xamarin",
    "Microsoft.VisualStudio.ComponentGroup.UWP.Support",
    "Microsoft.VisualStudio.Component.WindowsAppSdkSupport.CSharp",
    "Microsoft.VisualStudio.ComponentGroup.WindowsAppDevelopment.Prerequisites",
    "Microsoft.VisualStudio.ComponentGroup.UWP.NetCoreAndStandard",
    "Microsoft.VisualStudio.Workload.Universal",
    "Microsoft.NetCore.Component.Runtime.3.1",
    "Microsoft.NetCore.Component.Runtime.7.0"
  ],
  "extensions": []
}
Bzw. in Screenshots sieht das so aus:
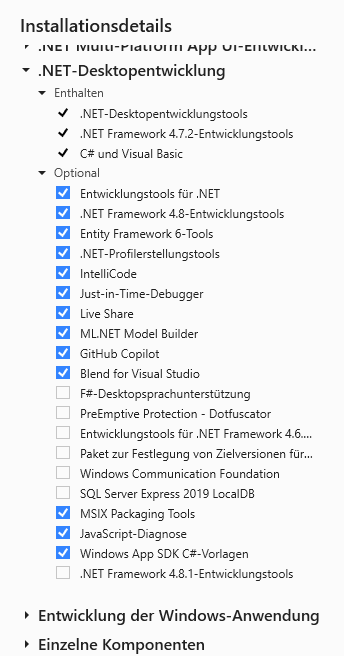
Achtung: Die installierte Visual Studio Umgebung ist ca. 25-35 Gigabyte groß und die Installation dauert u.U. über eine Stunde!
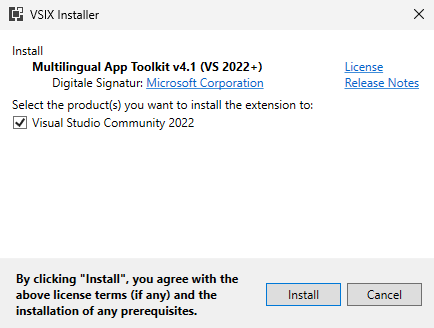
Installation von Multilingual App Toolkit v4.1 (VS 2022+) für Visual Studio
Zum Internationalisieren von Borepin können wir das Multilingual App Toolkit nachinstallieren: https://marketplace.visualstudio.com/items?itemName=dts-publisher.mat2022
Borepin Projekt mit Git klonen
An einem geeigneten Ort das Projekt auschecken. Wir arbeiten derzeit mit einem aktualisierten Fork: https://gitlab.com/thejonny/borepin.git
git clone --recurse-submodules https://gitlab.com/thejonny/borepin.git
git checkout main
Projekt kompilieren
Wir öffnen die Datei Borepin.sln im Hauptordner des Projektes. Beim ersten Start von Visual Studio werden u.U. verschiedene Dependencies nachgeladen. Das kann ein Weilchen dauern.
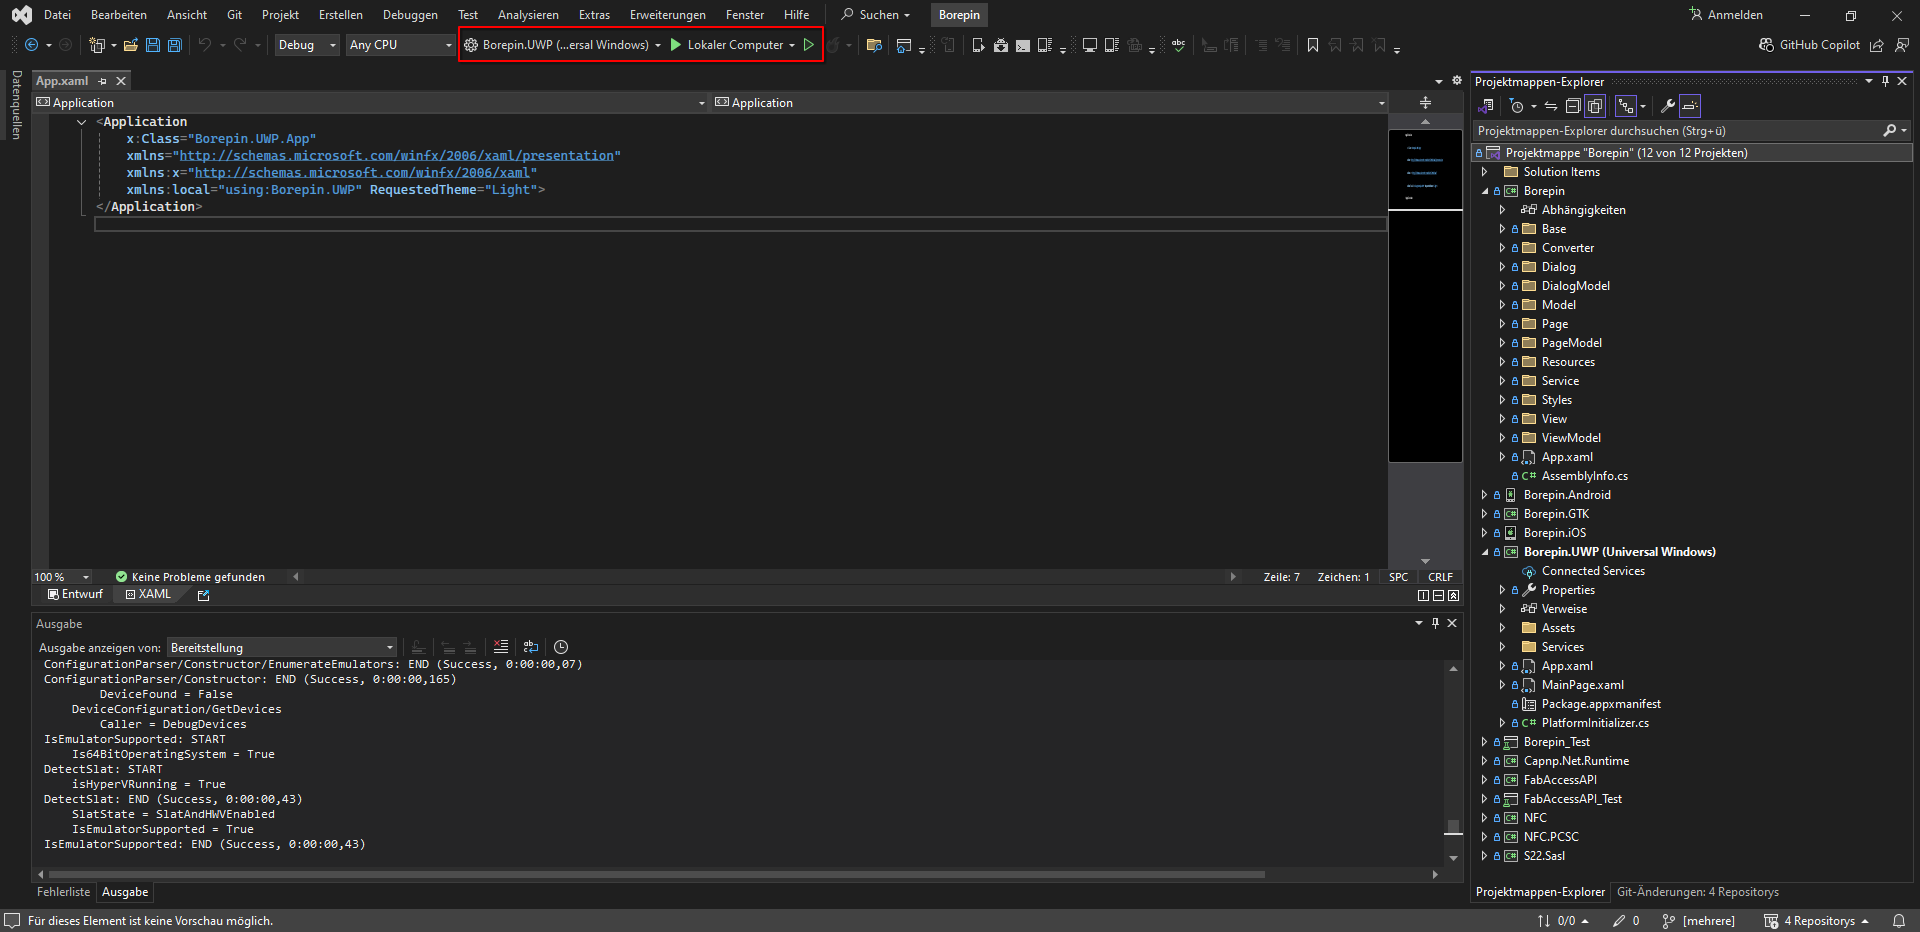
Zielarchitektur und Ausgabetype (Debug, Release) können in der oberen Leiste ausgewählt werden:

Über den kleinen grünen Play-Button können wir das Projekt schlussendlich compilen. Dieser Vorgang dauert u.U. ca. 5-10 Minuten. Zeit für eine kurze Kaffeepause ☕.
Das fertige Kompilat für UWP wird dann beispielsweise in \Borepin\Borepin.UWP\bin\x86\Debug\ abgelegt. Dieses ist nicht standlone ausführbar. Das heißt, dass wir dafür Visual Studio benötigen. Für eine distributierbare (veröffentlichte) Version als *.appx-Format siehe Kapitel App veröffentlichen (Standalone Anwendung lokal installieren via "Sideload").
Bei etwaigen Kompilierproblemen wird ein Systemneustart empfohlen, falls die obigen Abhängigkeiten erstmalig installiert wurden.
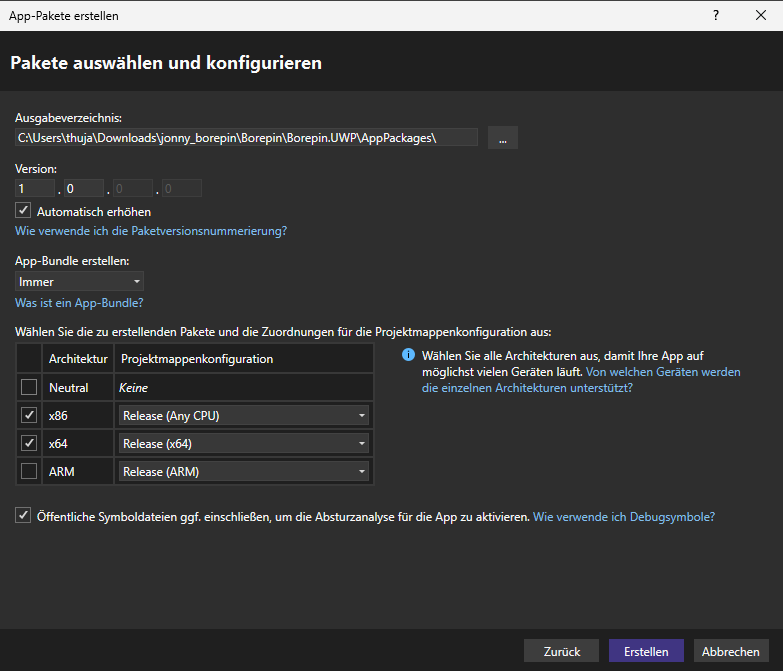
App veröffentlichen (Standalone Anwendung lokal installieren via "Sideload")
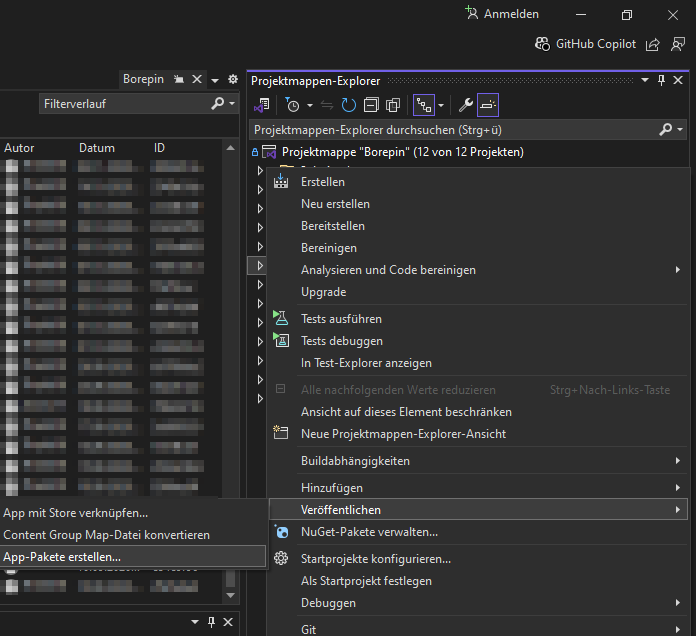
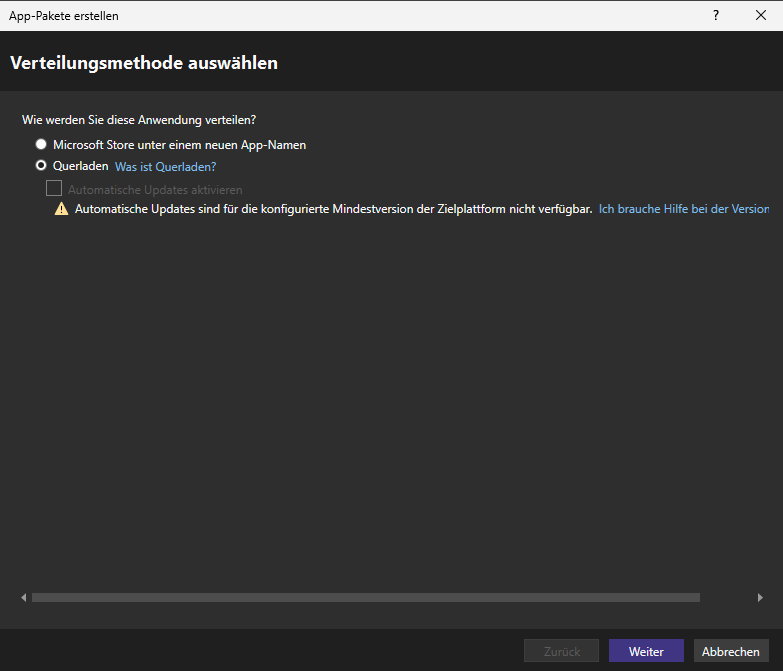
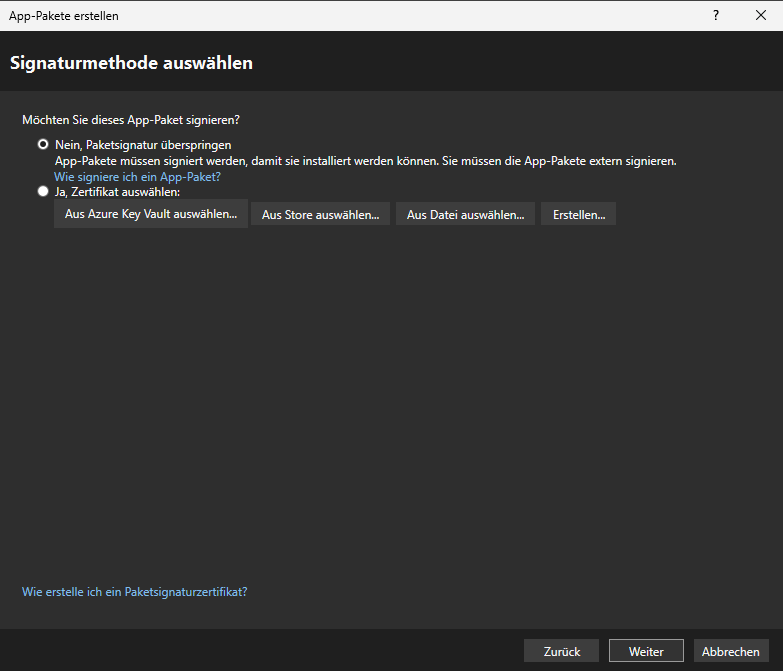
Zum Publishen von Borepin wählen wir rechts im Projektstrukturbaum Borepin.UWP aus und klicken rechts auf Veröffentlichen→ App-Pakete erstellen .... Dabei erstellen wir ein App-Paket vom Typ Querladen (Sideload) und klicken uns mit den Standardwerten durch. Nachdem wir den Button Erstellen klicken geht der Prozess los. Dieser dauert je nach Hardwareressourcen 10 - 15 Minuten. Zeit für noch eine gute Kaffeepause ☕.
Das fertige App-Paket befindet sich dann unter \Borepin\Borepin.UWP\AppPackages\Borepin.UWP_1.0.0.0_Test\. Dieser Ordner hält für die Installation folgende für uns relevanten Dateien bereit, die wir ausführen müssen (PowerShell). Als zusätzliche kleine Hürde muss dafür jedoch noch eine Policy einmalig ausgehebelt werden (siehe https:/go.microsoft.com/fwlink/?LinkID=135170).
Wir starten eine als Administrator privilegierte Shell und führen im Verzeichnis des App-Pakets aus:
# required once
Set-ExecutionPolicy -ExecutionPolicy Unrestricted -Scope CurrentUser
# Install Borepin
.\Add-AppDevPackage.ps1
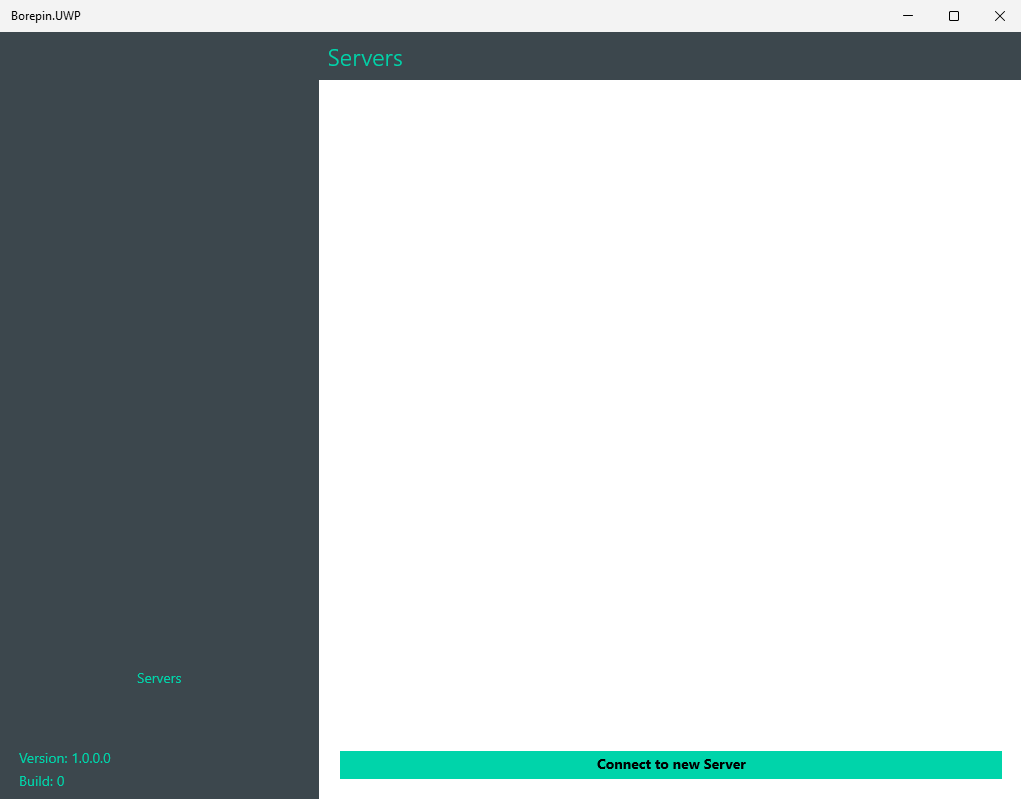
.\Install.ps1Letztendlich finden wir die installierte Testversion dann im Startmenü:

macOS / iOS
Der Kompilierprozess ist ähnlich zu Windows, da wir auch für macOS Visual Studio installieren können. Allerdings wurde Visual Studio zum 31.08.2024 von Microsoft offiziell abgekündigt. Es wird nur noch Visual Studio Code (kurz: VS Code) unterstützt.
Installation von Cap'n Proto
brew install capnprotoNach dem Installieren muss u.U. die capnp Binary per Symlink in /usr/local/bin oder in $PATH eingebettet werden.
Weitere Details für macOS / iOS sind aus Mangel an Support derzeit nicht vorhanden. Wir freuen uns über entsprechende Zuarbeiten.
Linux GTK
- Auf Linux benötigen wir das große Paket für Mono. Mono ist eine alternative, quelloffene Implementierung von Microsofts .NET Framework. Sie ermöglicht die Entwicklung von plattformunabhängiger Software auf den Standards der Common Language Infrastructure und der Programmiersprache C#.
- Ubuntu 24
- Auf Ubuntu gehen wir wie folgt vor:
# Mono Repository hinzufügen
sudo apt install ca-certificates gnupg
sudo gpg --homedir /tmp --no-default-keyring --keyring /usr/share/keyrings/mono-official-archive-keyring.gpg --keyserver hkp://keyserver.ubuntu.com:80 --recv-keys 3FA7E0328081BFF6A14DA29AA6A19B38D3D831EF
echo "deb [signed-by=/usr/share/keyrings/mono-official-archive-keyring.gpg] https://download.mono-project.com/repo/ubuntu stable-focal main" | sudo tee /etc/apt/sources.list.d/mono-official-stable.list
sudo apt update

# Mono und weitere Pakete installieren
sudo apt install mono-complete gtk-sharp2 libcanberra-gtk-module nuget capnproto git
nuget update -self- Projekt klonen
cd ~/
git clone https://gitlab.com/fabinfra/fabaccess/client.git --recurse-submodules
cd client/- In dem Repo herumstochern und Projekt kompilieren
cd ~/client/

#Entfernen, was wir nicht brauchen
rm -rf ~/client/Borepin/Borepin.Android/
rm -rf ~/client/Borepin/Borepin.UWP/
rm -rf ~/client/Borepin/Borepin.iOS/
rm -rf ~/client/Borepin/Borepin.macOS/
rm -rf ~/client/Borepin_Test/
rm -rf ~/client/FabAccessAPI_Test/

#diese Einträge entfernen wir außerdem in:
vim Borepin.sln

nuget restore

cd packages/
nuget install NLog
nuget install dryioc.dll -Version 4.7.7
#in den folgenden 3 Dateien tauschen wir die Version für DryIoc von 5.3.1 zu 4.7.7
vim ~/client/Borepin/Borepin.GTK/app.config
vim ~/client/Borepin/Borepin.GTK/Borepin.GTK.csproj
vim ~/client/Borepin/Borepin.GTK/packages.configmsbuild /restore
msbuild -t:Borepin_GTK
cp ~/client/packages/NLog.5.3.4/lib/net45/NLog.* ~/client/Borepin/Borepin.GTK/bin/Debug/- Borepin starten
- Das konnte aktuell nicht erfolgreich durchgeführt werden
mono ~/client/Borepin/Borepin.GTK/bin/Debug/Borepin.GTK.exe- der StackTrace:
(Borepin.GTK:4704): Gtk-WARNING **: 01:31:17.439: Im Modulpfad »adwaita« konnte keine Themen-Engine gefunden werden,
Exception in Gtk# callback delegate
  Note: Applications can use GLib.ExceptionManager.UnhandledException to handle the exception.
System.NullReferenceException: Object reference not set to an instance of an object
  at Xamarin.Forms.Platform.GTK.Platform.GetRenderer (Xamarin.Forms.VisualElement element) [0x00000] in <db5c3415edd24a4aa8ae86f8bebc9a57>:0
  at Xamarin.Forms.Platform.GTK.FormsWindow.OnConfigureEvent (Gdk.EventConfigure evnt) [0x00033] in <db5c3415edd24a4aa8ae86f8bebc9a57>:0
  at Gtk.Widget.configureevent_cb (System.IntPtr widget, System.IntPtr evnt) [0x00014] in <7aab76e87bce48a4b45cf7fa613cb70c>:0
  at GLib.ExceptionManager.RaiseUnhandledException (System.Exception e, System.Boolean is_terminal) [0x00000] in <ed39f21b9e9343dcbd442a17ad356a9f>:0
  at Gtk.Widget.configureevent_cb (System.IntPtr widget, System.IntPtr evnt) [0x00000] in <7aab76e87bce48a4b45cf7fa613cb70c>:0
  at Gtk.Application.gtk_main () [0x00000] in <7aab76e87bce48a4b45cf7fa613cb70c>:0
  at Gtk.Application.Run () [0x00000] in <7aab76e87bce48a4b45cf7fa613cb70c>:0
at Borepin.GTK.MainClass.Main (System.String[] args) [0x00000] in <674198d89d1447e7b051f706516309ae>:0 - oder mit Wine
- Das konnte aktuell nicht erfolgreich durchgeführt werden
sudo apt install wine sudo apt-get install winetricks
winetricks dotnet45

#Borepin starten
wine ~/client/Borepin/Borepin.GTK/bin/Debug/Borepin.GTK.exe- ArchLinux
pacman -S mono mono-msbuild gtk-sharp-2 nuget capnproto- ... und so weiter
- IDEs zum Entwickeln von Borepin
- MonoDevelop
- JetBrains Rider